In this article, we will discuss how to prepare a microscope slide, how to draw cells from microscope slides and photomicrographs, and the method for calculating the magnification of images. So, let us get started.


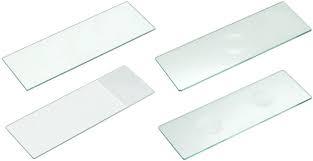
How to Prepare a Microscope Slide?
In this section, we will discuss how to prepare a microscope slide. Consider the following points when you are about to prepare the microscope slide to observe the cellular material.
- To observe cellular material thoroughly, prepare the specimens to view them under the light microscope.
- Samples should be thin so that light can pass through them
- The appropriate preparation relies on the cellular material that needs to be observed.
Slide Preparation Method
Dry mount
- Solid specimens
- Thin slices, known as sectioning
- Place a coverslip on the top
- Common uses include pollen, dust, hair, muscle, and plant tissues
Wet mount
- Wet specimens
- Suspended in immersion oil or water
- Place a coverslip at an angle
- Common uses include aquatic samples and other living organisms
Squash slides
- Soft specimens
- Wet mount that is squashed between slide and coverslip
- Common uses include root cells to be viewed at cell division
Smear slides
- Body fluid specimens
- The edge of the slide is employed to smear the sample
- A thin even coating is created
- Common uses include blood smears to view erythrocytes
Common Microscopic Stains and Their Uses
Now, let us see which common stains are used during microscopic observation and what are their respective uses.
The three common stains used for microscope slides are:
- Crystal violet: This stain stains cell walls purple. It is employed in gram staining.
- Methylene blue: This stain is used to stain the nuclei in the animal cell for giving the contrast.
- Congo red: It is the negative stain that is not taken up by the cell, but it gives a contrast between the cell and the background.
Important points to consider
Consider the following points while preparing the slide:
- Remember that samples should be stained because some cell structures and cytosol can be transparent or hard to differentiate
- To stain a slide, air dry and heat the sample by passing it through a Bunsen burner flame. This is done so that the sample can be fixed to the slide and it can take up the stain
- Depending upon the kind of preparation, the stain type used relies on the type of specimen used
How to draw cells?
- Often a labeled biological drawing is created to record the observations viewed under the microscope
- Biological drawings refer to the line pictures that depict appropriate features that are observed when the specimen was seen
- There are several conventions or rules that are followed during biological drawings.
Conventions for Biological Drawings
The conventions for biological drawing are as follows:
- A title should be included in the drawing
- Record the magnifications under which the observations exhibited by the drawing are made
- Use a sharp HB pencil and a quality eraser
- Use plain white paper to make drawings
- Make clear, single lines. Do not use thick shading
- Do not use any shading in the drawing
- Take as much space on the page as possible while making the drawing
- Draw well-defined structures
- Draw drawings with appropriate proportions
- Make sure that the label lines do not cross and they have arrowheads that have a direct connection to the part of the drawing that is being labeled.
- Keep the label lines on one side of the drawing, i.e. in parallel to the top of the page, and draw them with a ruler
Usually, the cells are drawn when they are viewed at a higher magnification power. On the other hand, plan drawings are made of tissues seen under lower magnification. Remember that individual cells should not be drawn in a plan diagram
In the next section of the article, we will see how to calculate the magnifications of images.
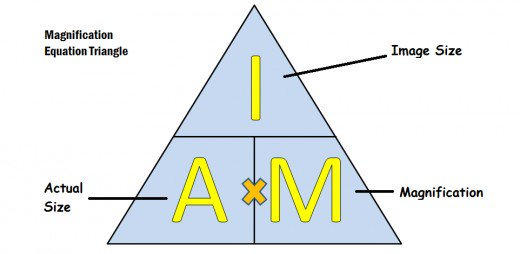
How to Calculate Magnifications?
Magnification refers to the number of times the image of the observed specimen is bigger than the actual size of the specimen.
The magnification of an image is represented by the letter “M” and it can be calculated only if we know the size of the image represented by “I” and the actual size of the specimen represented by “A”.
Now, we will elaborate on how to calculate magnification through the following example.
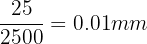
Example
Suppose an image of a plant cell is 25 mm in size and is magnified by the factor of X 2500. Calculate the actual size of the cell.
Before calculating the actual size of the cell, remember the following points:
- Use the micrometer scale to measure the size of the cells. Cellular structures are usually measured either in micrometers or nanometers.
- All measurements must have the same units while doing the calculations. The best thing is to use the smallest measurement unit as given in the question.
- Multiple and divide the units depending on whether they are increasing or decreasing
- Magnification has no unit
- 1 micrometer has 1000 nanometers
- 1 millimeter has 1000 micrometers
- 1 meter has 1000 millimeters
Now, we will calculate the magnification of the plant cell using the data in the question
Use the following formula to calculate the actual size of the cell.
Actual size = 
= 
=

- In the diagram, the stage micrometer has three lines each 10 µm apart
- Each 10 µm division has 40 eyepiece graticule divisions
- 40 graticule divisions = 10 µm
1 graticule division = number of micrometers ÷ number of graticule division
- 1 graticule division = 10 ÷ 40 = 0.25 µm this is the magnification factor
- The specimen slide would be used to replace the stage micrometer and the eyepiece graticule at the same magnification would be used to measure the length of the object
- The number of graticule divisions can then be multiplied by the magnification factor:
graticule divisions x magnification factor = measurement (µm)
In the next article, Microscope in Cell Studies II, we will discuss how to measure the actual size of the specimen, how to make measurements using an eyepiece graticule and stage micro meter scale, what are resolution and magnification, and differences between light and electron microscopes.
Summarise with AI:
Did you like this article? Rate it!